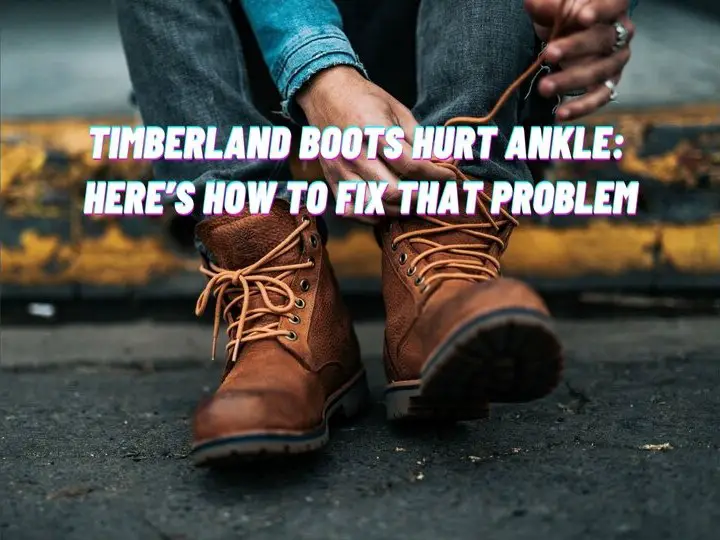
No one likes break-in periods. It’s like a YouTube ad, everyone just wants to get over it. Like every other leather boot out there, Timberlands also have a break-in period.
But for some people, their Timberland boots hurt their ankles. Break-in periods already result in blisters for a lot of people. So, there’s no need to rub salt in the wound.
Timberland boots are popular for their durability and style, but they can also be uncomfortable and cause ankle pain for some wearers. There are several ways to address this issue, including breaking in the boots, lacing them up properly, and using a baseball bat and stretching spray to stretch the material. Additionally, wearing the right socks and taking time to break them in can help make Timberland boots more comfortable.
But that’s not all there is to it. Most people suffer from break-ins and all that. So, let’s see how you can get yourself out of this situation-
How to Fix Timberland Boots Hurt Ankle: 3 Methods
The first few weeks of wearing a new pair of boots isn’t that enjoyable, mostly because the boots haven’t taken the shape of your feet. But dealing with ankle pain makes things even worse.
That said, here’s how you can fix your boots so that they won’t hurt your ankle anymore-
Method 1: Break in the Boots
This one’s obvious. If the boots are still new or you haven’t worn them for at least a month, you can’t expect the perfect fit. But you can ensure complete protection for your Timberlands.
However, there’s a mammoth of fake info when it comes to breaking in boots. It’s a tough job getting all the right information on how to do it in a safe and effective manner. Here’s an in-depth piece on how you can break in Timberland boots.
But if you want to know in short. Here’s what you can scan through in a minute
- Start by wearing your Timberland boots for short periods of time, such as 30 minutes to an hour at a time. This allows your feet to adjust gradually to the boots.
- Wear thick, long socks to protect your feet from blisters and prevent the rough edges of the boots from rubbing against your ankles. If the boots are a bit roomy, the thick socks will fill up the space and prevent rubbing against the ankle bone. If you don’t have any thick enough socks, you can also double up on them for additional protection.
- Use a leather conditioner or oil to soften the leather and make it more pliable. Apply a small amount of the conditioner or oil to the boots and rub it in with a clean cloth. Allow the boots to sit for a few hours or overnight.
- Walk around in your boots, preferably on a softer surface, such as carpet or grass, to help the leather stretch and conform to the shape of your feet.
- Repeat steps 1-4 several times until the boots feel comfortable and broken in. Be patient, as the process may take a few days or even a few weeks depending on how often you wear the boots.
Remember, breaking in your Timberland boots can be a bit uncomfortable at first, but once they’re broken in, they’ll be comfortable and durable. Good luck!
Method 2: Lace-up the Boots Properly
It might seem obvious but plenty of people suffer from ankle pain because they haven’t laced up properly. Every pair of boots is different, much like our feet.
As we’re eliminating one cause after another, it’s better to investigate thoroughly. Even if you’ve done everything to break in the boots, make sure the lacing is perfect.
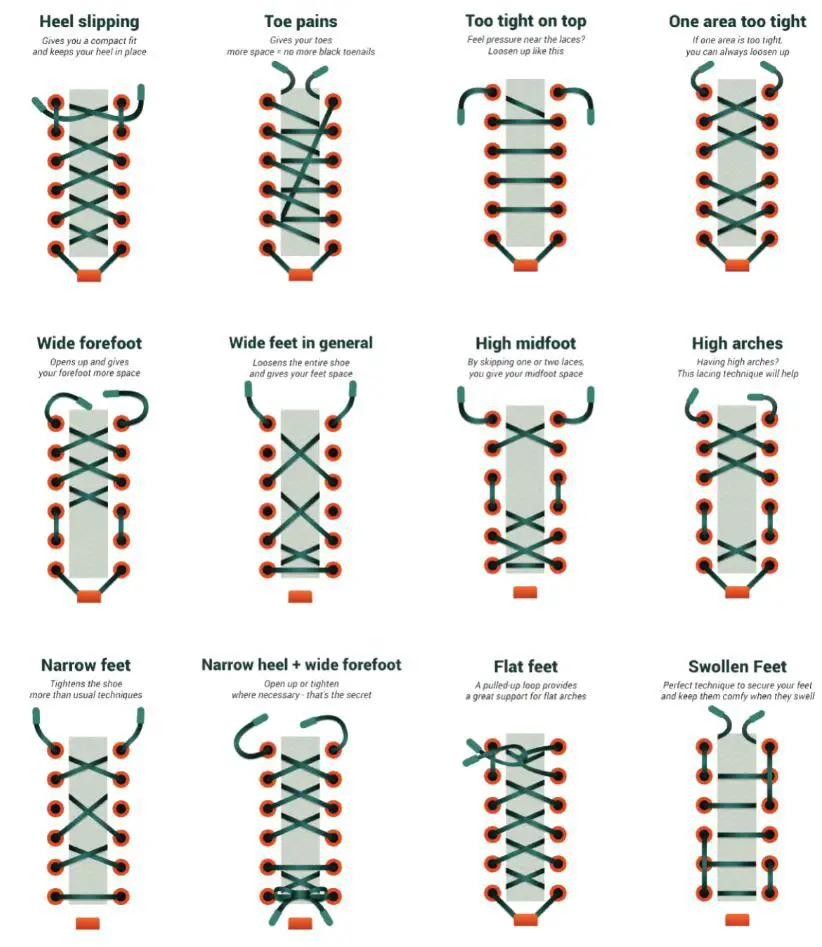
How to Lace Timberland Boots?
Properly lacing up is something not many people care about. But it saves you from problems like ankle pain and obviously creases(seems far-fetched? well, the tension alone is enough to bring in loads of creases).
Related: How to Uncrease Timberland Boots? Effective 7-Step Solution
Step 1: Untie the Laces
Start by untying the laces all the way through the eyelets and stop with the bottom of the boots. Removing the laces is a must especially if you want to clean your Timberland boots. However, there’s a whole different process if you want to remove ink from Timbs.
Step 2: Ensure the Tongue is in the Central and Tucked
The tongue is there to keep out any water or debris from entering the boots. But apart from that, it’s a pretty essential component when it comes to a comfortable fit.
Step 3: Put the Shoes on and Position Your Leg at 90°
You’re just lacing your boots, why’d you need to put them on? Well, if you lace up without putting them on, 90 percent of the time, there will be a heel slip.
After that, position your leg at 90°. No need to fancy it up. Just keep your foot straight on a bench and you’ll be good to go.
Step 4: Pull the Laces Towards the Top
Now start pulling the laces towards the top of the boots through the eyelets. However, don’t pull too much or you’ll cut off blood circulation, which will cause discomfort sooner or later. But they shouldn’t be too loose.
Remember one thing. If you can get your finger underneath, it’s not tight enough. Couldn’t get any simpler, right?
Step 5: Tie a Simple Knot at the Top Eyelet(not the ankle cuff)
There’s going to be tension all over the lace. So, there’s no need to push it. Your target is to get maximum comfort and stability.
Step 6: Form an X on the Ankle Cuff Lace Loops
It sounds complicated, I know. But it’s really simple. Instead of going serially, tie up the top lace first, crossing over the lower loop.
Step 7: Put a Double Knot
That’s it. Put in a double knot and you’ll have a perfectly laced-up pair of boots.
Following with text can be really hard in this situation. So, I’m dropping down a video so you can get a better idea. It’s not a Timberland video but right now relieving from pain is the primary goal, not fashion.
Look Out for Excess Flap/Stitching on the Tongues
You never know when you’re getting a defective pair of boots. Especially for a company like Timberland who’s a large manufacturer, mistakes do happen.
Even though the chances are low, you might get a defective pair. A few people have seen boots with an excess flap or stitching on the tongue. Ideally, you should return the boots and get another pair.
But if you can’t do that, cutting up that excess part is a simple solution. In most cases, that’s going to solve the problem.
Method 3: Use a Baseball Bat and Stretching Spray
If you want an instant solution, there’s no better alternative than this. The only problem is you’re going to have to spend some money on it.
Using a simple baseball bat and stretching spray you can fix the boots. I know it sounds unconventional. But at the end of the day, there’s no denying it works. And there’s a whole article for you to learn whether Timberlands stretch or not.
How to Stretch Leather Boots Around Ankle?
What You Need:
- A baseball bat
- Boot stretcher spray
Step 1: Spray the Stretcher Spray Inside and Outside

Start spraying the spray on the side seams. Don’t worry about spraying on the insides, it’ll dry out faster than you can count to 10.
Step 2: Gently Tap the Seam with a Hammer
Sounds ridiculous, doesn’t it? Well, it’s similar to the heat situation. As long as you don’t go overboard, it’ll be beneficial for the boots.
Anyway, start by tapping a smooth face hammer on the side seams. This will flatten and soften the leather in that area.
Take your time doing it. And once you’re done, move over to the other side and continue.
Step 3: Train the Leather to Roll Out
Bring out your baseball bat and start putting pressure on the sides. Train the leather to roll out instead of rolling in.
Needless to say, a shoe stretcher would’ve been great at this point. But it’s a DIY method and not many people own a shoe stretcher.
It’s going to require a bit of effort but if you don’t want to buy a shoe stretcher, do it 2 to 3 times. Before you know it, the boots are going to be all loosened up, relieving that ankle pain.
How Long Does It Take to Break in Timberlands?
A new pair of leather boots is going to take 4-5 weeks to properly break in. Even if you wear the boots every day (which you shouldn’t), it will need that time to conform to the shape of your feet. Once the boots are broken in, they’ll hold that shape throughout their lifetime.
However, you can always speed up the process. I’ve seen people breaking in boots in a matter of days, if not hours.
So, don’t focus too much on the ‘4-5 weeks’. Follow the method I’ve explained and you’ll have boots broken in before tomorrow.
How to Make Timberland Boots More Comfortable?
The first few weeks of the ‘break-in’ period are hard. Wearing the boots for too long might result in blisters and whatnot. So, you’d want to do everything you can to make the boots a bit more comfortable.
That said, here’s what I suggest-
Don’t Go All out in the First Few Weeks
I know the excitement of a new pair of boots. But you have to remember, the boots haven’t accepted you yet. You need to tame the boots by breaking them in. Only then, you can take your Timberlands in the snow.
Related: Are Timberlands Good for Snow? (The Answer is a Bit Complicated)
Instead of wearing them every single day, skip a few days. Wear another pair. Give your boots and your feet some rest. This way it’s better for both.
Wear the Right Socks
Most people don’t give a second thought about the socks. Whether you realize it or not, socks are vastly responsible for moisture management. A dry sock means your feet are cooler when it’s summer, and warmer when it’s winter.
Anyway, here’s what you need to look out for in socks-
AVOID Cotton Socks
There’s nothing more horrible than wet cotton socks. When they get wet, they lose most of their cushioning ability, making them pretty useless.
If you ask me, the only thing cotton socks are good at is they’re cheap. That’s it.
Polyester Socks Are Quite Good
Instead of absorbing all the moisture, polyester socks keep it away. The heat from your feet also helps in the process, so that’s a plus point. If you have to wear socks for a long time, polyester socks are a good choice.
Wool Socks Are the Best (Also for breaking in boots)
Wool is naturally antimicrobial(it doesn’t stink). On top of that, wool socks make sure your feet are dry and comfortable.
If you get the good ones, they’ll offer cushions on the bottom with a ventilated weave above.

If you want to end the break-in period as fast as possible, a pair of thick wool socks might become your best friend. Wear boots with socks and walk around in the house. Within a few days, the boots should break in.
Use Tongue Pads

For ankle pains, tongue pads are a great solution. You don’t have to do much to make the boots comfortable as applying them is pretty easy.
Get a Pair of Supportive Insoles
Even though it’s not going to do much about your ankle pain, breaking in leather boots is already tough enough. So, any help you get is appreciated. A pair of supportive insoles can really uplift the comfort of a work boot.

Use a Shoe Tree
There’s no need for you to spend a ton of money on authentic cedar wood shoe trees. Instead, get something like this that’s affordable and works just as well.

Wrapping Up
Unless your Timberland boots are defective, don’t worry too much. Give the boots some time to adjust to your feet. Sooner or later, the boots will take the shape of your feet.
If you’ve found any other solution regarding this problem, drop a comment below. I’d love to get your opinion about it.